
Tutorial blog to access Amazon ElastiCache from AWS Lambda
- Vaibhav Deshpande
- Feb 28, 2024
- 3 min read

Updated: Mar 11, 2024
This blog is created by Aryaman Singh Chandrawat & updated by Rucha Kulkarni.
Learning Objectives:
Learn to create ElastiCache for Memcached.
Learn to access ElastiCache from AWS Lambda.
Step 1:
In AWS console search for Elasticache service. In ElastiCache console click on Get Started.

Select Memcached.

Click on Create Memcached cache.

Now under Create Memcached cache Choose the cluster creation method as Serverless.

Give the name as MyCache-Memcached.
Provide description as Serverless Cache.

Keep rest everything as default and click on Create button in bottom right corner.

Note: It will take a few seconds for the ElasticCache to get created
Now you can see the created cluster in the ElastiCache console.

Click on the created cluster and copy the endpoint and save it.

Step 2:
Go to IAM Console and select Roles.

Now click on Create Role.

Under Trusted Entity type, select AWS service.

Under Use Case, select Lambda.

Click Next.

Under Add Permissions, Search AWSLambdaVPCAccessExecutionRole and select it.
Click Next.

Under Name, review and create, Enter:
Role Name: lambda-vpc-execution-role

Click on Create Role button on bottom right corner.

Your lambda-vpc-execution-role Role is created. Now you can view your created role in Role's console.

Step 3:
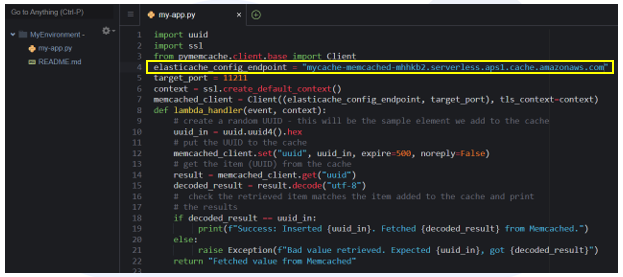
Open the Cloud9 environment and create a new file. Copy the Python code given below and paste it in the file:
import uuid
import ssl
from pymemcache.client.base import Client
elasticache_config_endpoint = "mycache-memcached-0rluje.serverless.aps1.cache.amazonaws.com"
target_port = 11211
context = ssl.create_default_context()
memcached_client = Client((elasticache_config_endpoint, target_port), tls_context=context)
def lambda_handler(event, context):
# create a random UUID
uuid_in = uuid.uuid4().hex
# set a dictionary with both UUID and name to the cache
cache_data = {"uuid": uuid_in, "msg": "by a cloud enthusiast."}
memcached_client.set("userdata", str(cache_data), expire=500, noreply=False)
# get the item (dictionary) from the cache
result = memcached_client.get("userdata")
# decode the result and convert it back to a dictionary
decoded_result = eval(result.decode("utf-8"))
# check if the retrieved item matches the item added to the cache
if decoded_result["uuid"] == uuid_in :
success_message = f"Success: Inserted {uuid_in} {cache_data['msg']}. Fetched {decoded_result} from Memcached."
print(success_message)
else:
raise Exception(f"Bad value retrieved. Expected {uuid_in} , {cache_data['msg']} but got {decoded_result}.")
return "Fetched value from Memcached"
Save the python code and name it as my-app.py.

Note: When you paste the Endpoint, please do not paste the port no: 11211 as we have mentioned it in the next line as target_port=11211
Replace the elasticache_config_endpoint on line 4 with the endpoint we copied in Step:1.

Open terminal and create a folder my-package to install the pymemcache library into using commands given below.
mkdir my-package
Now install pymemcache library using pip.
pip install --target ./my-package pymemcache
Move the my-app.py file to the my-package folder.
mv my-app.py my-package
These commands will install the pymemcache library in your directory.

Now create a zipped folder containing the pymemcache library and app.py file and name it my-deployment-folder.
zip -r my-deployment-folder my-package
Your compressed .zip folder will look like this.

Download this my-deployment-folder and save it in your local storage.
Step 4:
Go to AWS Console and search for Lambda Service. Now click on Create a function.

Under Basic Information, Enter:
Function Name: MyLambdaFunction
Runtime: select Python 3.12 from drop down menu

Under Change default execution role, select Use an existing role, then select lambda-vpc-execution-role from drop down menu.

Now click on Create Function button on bottom right corner.

You can view the created function in the Lambda Function console.

Now select the function and go to Code tab.

Scroll down to Code Source, click on Upload from button in the right corner.

Click on .zip file and upload the my-deployment-folder.zip folder.

Scroll down you will see Runtime settings, click on Edit button and rename Handler to my-app.lambda_handler and click Save.

Now navigate to Configuration tab. Under VPC, click on Edit button and select default VPC from the drop-down menu.

Select 3 subnets from the drop-down menu.
Also, select the default Security group from the drop-down menu.
Click Save.

Navigate to Test tab. Under Test event, click on Test button in the right corner.

When the test is completed, you will see the success message as below.

Scroll down, you will see that the 'uuid': '851911172f8e4ef8bd8f06b178f09e48', 'msg': 'by a cloud enthusiast.' which we provided in the code above is fetched.

Congratulations!! You have now accessed Amazon elasticache using lambda function.
Note: After completing the tutorial, make sure to delete the lambda function, Memcached cluster and the cloud9 environment to avoid any AWS charges.
Was this document helpful? How can we make this document better. Please provide your insights. You can download PDF version for reference.
For your aws certification needs or for aws learning contact us.
well defined
well defined
Helpful blog sir
Good blog..
Easy to follow