
Amazon EBS Volume Backup and Restore in different AZ
- Parag
- Jan 21, 2021
- 3 min read

Updated: Mar 13, 2024
Persists EBS volume beyond the life of an EC2 instance, takes snapshot & restore the EBS volume with increased storage capacity to a new instance.
This blog is updated by Gokul M.
Objectives:
1. Learn to persist EBS Volume beyond the life of an EC2 instance.
2. Resolve the problem of storage capacity for EC2 instances.
Step 1: Create a Linux Instance by following the steps:
Click on the Instance option in the left navigation panel. It will direct to the following page. Click on the Launch Instance button on the top left.

After clicking the Launch Instance, you will be redirected to the page below. Under Name and Tags give a name as MyLinuxServer and click on additional tags.

Click on the Next: Add Tags button in the down-right corner.
Add Tags
Key: Name
Value: Linux Server

In Application and OS image (Amazon Machine Image) choose Instance Type. Under Amazon Machine Image (AMI), choose Amazon Linux 2023 AMI.

Under Instance type, select t2.micro

Under the key pair section, select the existing key pair. Here we are using the Mumbai server. You can choose the key pair according to your server.

In Network settings, click on the Edit option at the right corner.

Keep VPC as default and choose anyone subnet from the downlist. Here we are using 1b.
In the Auto-assign public IP, select the enable option.

Step:2
In Firewall Security, choose Create Security group.
Security Group name: LinuxSG
In the description enter the following text, Security Group for Linux Servers
Keep the default SSH rule and in the Source type, select Anywhere
Warning: Rules with the source of 0.0.0.0/0 allow all IP addresses to access your instance. We recommend setting security group rules to allow access from known IP addresses only. While using this feature for production make sure the known IP address is entered.

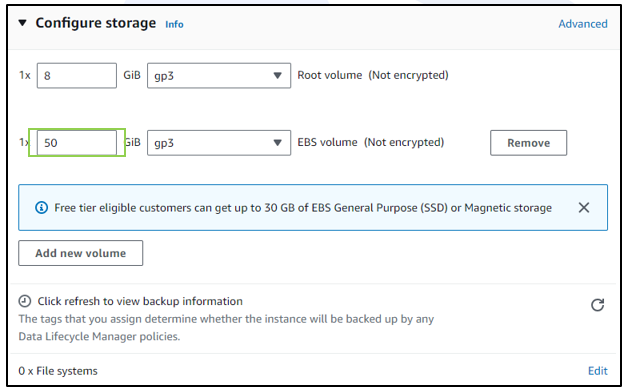
Under Configure Storage, click on Add new Volume.

Let everything be the default and mention the required size of the volume 50GB in this case.
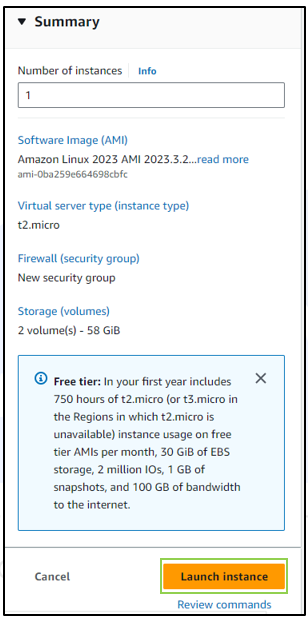
In the Summary section review your instance details and click on Launch Instance.
Go back to the Instances, your Instance will be created.

Step:3
In the left panel of the AWS console go into Volumes, under Elastic Block Store. Here you will see our 2 volumes created (One was added by default with the instance and the other by extra that we added)
Name these two volumes as ROOT (8GB) and DATA (50GB) below the name category by clicking the pencil icon in the name column.
Select the DATA volume and click Create Snapshot on Actions.

Step:4
In the Create Snapshot pop-up window, give a description as Snapshot for Added EBS.
Click on Add Tag and give Key and Value as follows:
Key-Name
Value-MySnap


Click on the Snapshots option on the left navigation panel and check that the snapshot has been created.

Step:5
Create a new Linux Instance in a different availability zone by choosing a different Subnet at the Configure Instance Details step.
Follow the Step 1 and Step 2.
Do not create an additional volume. Just keep the default Root Volume.
Note this Subnet. For our understanding, we take the example as ap-south-1b.

Go to Snapshots under Elastic Block Store. Click on Actions and select Create Volume from Snapshot.

We choose the same subnet in which this new Instance is created.
Note: Choose the same subnet while creating its associated Instance in the future.
Click on Create Volume.

Click on Create Volume.

Step:6
In the same Volume Tab, we observe that the DATA2 volume is in the available state and the Root volume of the new server is in the in-use state.

Step:7
Go to Volumes. Select the DATA2 volume. Go to Action -> Attach Volume.
Select your newly created instance in the Instance text field. Keep the rest as default. Finally, Click the Attach Volume.


Now the volume is successfully attached to the instance.
Thus, the volume restored in a new availability zone through a snapshot is attached to an instance in that AZ successfully.
Note: If you no longer need this instance and the Volume, make sure to terminate the instance and delete the volume and snapshot.
Was this document helpful? How can we make this document better. Please provide your insights. You can download PDF version for reference.
For your aws certification needs or for aws learning contact us.


helpful
Helpful.
easy steps to follow
Very useful !
Easy and useful