EC2 Linux Web Server
- Parag
- Sep 21, 2020
- 2 min read
Updated: Oct 9, 2023
Provision a web server on Linux instance with bootstrapping script Objectives:
Learn to install an Apache web server on EC2 Linux Instance.
Learn to run user data shell script to install Apache web server.
Step 1: Login to AWS Console and go to EC2 services. On the dashboard, click on Launch Instance.

Step 2: After clicking on the launch instance you will be redirected to this page. In Name and tags section, type Linux Server in text field labeled Name.

Step 3: Here search/select Amazon Linux 2 AMI 2023

Step 4:In the next Choose an Instance Type section, select the t2.micro.

Step 5: In Key pair (login) section, click on dropdown to select an existing KeyPair. If you haven’t created a key, follow the below steps:
a) Click on Create a new key pair.
b) Type Key Pair Name of your choice. For e.g. MyKeyPair.
c) In key pair type select RSA radio button.
d) In private key file format select .pem radio button.
e) Now Click on Create a key pair. This will download a .pem file.
Save this file for future use.

Step 6: In Network settings section, click edit to change the following
a) In the Subnet field select on the drop down list and select any one of the Subnets.
b) In the Auto-assign Public IP field select on the drop down list and select Enable option.

Step 7: Configure Security Group
a) Create a new security group and name it as WEBSERVER_SG
b) In the description enter the following text: Security Groups for webservers
c) Keep the default SSH rule and add a new rule. From the drop-down list select HTTP Rule.
d) Note - Warning: Rules with source of 0.0.0.0/0 allow all IP addresses to access your instance. We recommend setting security group rules to allow access from known IP addresses only. Ignore this for this Tutorial.
e) While using this feature for production make sure the known IP address is entered.

Step 8: Continue to scroll down and under Advanced Details, paste the following script in User data text area.
#!/bin/bash
yum -y update
yum -y install httpd
chkconfig httpd on
service httpd start
echo "<html><h1>Hello! How are You? This is your Web Server!</h1></html>" > /var/www/html/index.html

Step 9: Let rest all remain as default & Click on Launch instance in the Summary section on the right to launch the instance.

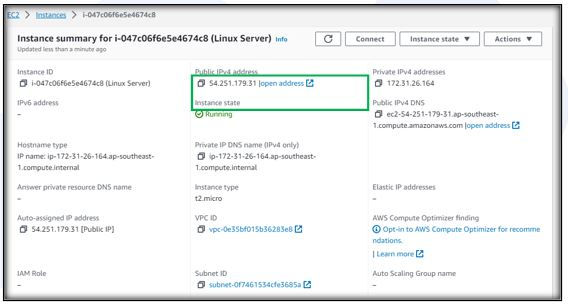
Step 10: Click On Instances at the top left of your page under Instances. You will be redirected to Instances dashboard. Ensure that your Linux instance is running.

Step 11: Check the Web Server Is Running
Copy the IPv4 Public IP or the DNS name. Search the IP address to check if the web server is running.


If the message is visible, it message means the web server is running.
Step 12: If you no longer need this instance make sure to terminate the instance
a) Click on Instance State drop-down button and click on Terminate Instance.
b) This will terminate your instance.

Was this document helpful? How can we make this document better. Please provide your insights. You can download PDF version for reference.
For your aws certification needs or for aws learning contact us.


Explained in detail, easy to understand
Easy to understand.
Easy to understand
It was easy to understand
Very useful sir