Tutorial blog to use Amazon EFS along with Amazon ECS
- Vaibhav Deshpande
- Nov 22, 2023
- 4 min read
Updated: Mar 12, 2024
This tutorial is updated by Dhanush Prabakaran.
Learning objectives:
1. Learn to create an ECS cluster.
2. Learn to use EFS file system with ECS to access data across fleet of Amazon ECS tasks.
Step 1: In AWS management console, go to ECS service.
On the Clusters page, choose Create cluster.

Under Cluster configuration, for Cluster name, enter My-EFS for the cluster name.

Choose Infrastructure, uncheck AWS Fargate (serverless) and check the Amazon EC2 instances.

To create a Auto Scaling group, from Auto Scaling group (ASG), select Create new group, and then provide the following details about the group:
For Operating system/Architecture, choose Amazon Linux 2.
For EC2 instance type, choose t2.micro.
For Desired Capacity, enter Minimum 1 and Maximum 2.
For SSH key pair, choose the pair that proves your identity when you connect to the instance.

In Networking, under Security group choose Use an existing security group and remove the default security group and choose WebServer-SG.
If you don’t have the WebServer-SG security group, then follow the steps to create the security group.
In AWS management console, go to EC2 instance service.
In the navigation pane, under Network and Security choose Security groups.
Choose Create Security Group.

Security group name: WebServer-SG
Description: Security group for Web Servers
Inbound Rules: Add rule
Type: SSH
Source: 0.0.0.0/0
Select Add rule
Type: HTTP
Source: 0.0.0.0/0
Choose Create Security group
Choose Create a Security Group, go back to the ECS tab and choose Security group name: WebServer-SG, click on Create to create the Cluster.
Step 2: Create a security group for your Amazon EFS file system with the following options:
In AWS management console, go to EC2 instance service.
In the navigation pane, under Network and Security choose Security groups.
Choose Create Security Group.
Security group name: EFS-SG
Description: Security group for EFS services.

Inbound Rules: Add rule
Type: NFS
Source: 0.0.0.0/0
Choose Create Security group

In AWS management console, go to EFS service.
Choose Create file system.

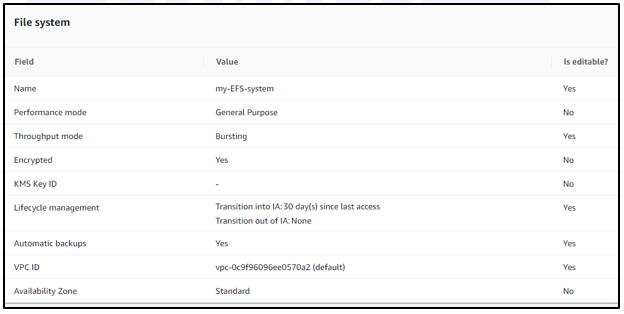
Name: my-EFS-system.
Keep VPC default and select Customize.

Scroll down to Lifecycle Management.
Uncheck Enable automatic backups.
In Lifecycle Management,
Transition into Infrequent Access (IA): None
Transition into Archive- new: None
Scroll down to Performance Settings.
Throughput mode: Bursting.

Choose Next.
On the Network access page, under Mount targets, replace the existing security group configuration for every availability zone with the security group you created for the file system i.e., EFS-SG.

You do not need to configure File system policy for this tutorial, so you can skip the section by choosing Next.

Review your file system options and choose Create to complete the process.

From the File systems screen, record the File system ID. In the next step, you will reference this value in your Amazon ECS task definition.

Step 3: In AWS management console, go to EC2 instance service.
Choose Launch Instance.
Name: my-EFS-instance.
Under Application and OS Images (Amazon Machine Image), select the Amazon Linux 2 AMI (HVM).

Under Instance type, keep the default instance type, t2.micro.
Choose the Key Pair.
Under Network settings, choose Edit and choose a subnet.
Auto-assign public IP: Enable.
Select any available: subnet
Select existing Security group choose WebServer-SG.
Under Configure storage, choose the Edit button for file systems, and then choose EFS.

Clear the Automatically create and attach security groups. Leave the other check box selected. Choose Add shared file system.
Choose Launch Instance.
Step 4: Connect you my-EFS-instance to SSH.
Execute the following command.
df -T

Next command
cd /mnt/efs/fs1
Next command
sudo nano index.html
Paste the following code.
<html>
<body>
<h1>Hi from Cloud-plusplus</h1>
<p>You are using an Amazon EFS file system for persistent container storage.</p>
</body>
</html>

Save the file using Ctrl+X, then Y and Enter.
Step 5: In AWS management console, go to ECS service.
In the navigation pane, choose Task definitions.
Choose Create new task definition, Create new task definition with JSON.

In the JSON editor box, copy and paste the following JSON text, replacing the fileSystemId with the ID of your Amazon EFS file system.
{
"containerDefinitions": [
{
"memory": 128,
"portMappings": [
{
"hostPort": 80,
"containerPort": 80,
"protocol": "tcp"
}
],
"essential": true,
"mountPoints": [
{
"containerPath": "/usr/share/nginx/html",
"sourceVolume": "efs-html"
}
],
"name": "nginx",
"image": "nginx"
}
],
"volumes": [
{
"name": "efs-html",
"efsVolumeConfiguration": {
"fileSystemId": "fs-1324abcd",
"transitEncryption": "ENABLED"
}
}
],
"family": "efs-tutorial"
}

Choose Create.
Step 6: On the Clusters page, select the cluster to run the standalone task in.
Scroll down and choose the Tasks tab.
Choose Run a new task.

In Compute options, select Launch type.
For Launch type, choose EC2.

Under Deployment configuration, Application type choose Task.
For Task definition, choose the efs-tutorial task definition that you created earlier.
For Desired tasks, enter 1.

Choose Create.
On the Cluster page, scroll down choose Infrastructure.
Under Container Instances, choose the container instance to connect to.
On the Container Instance page, under Networking, record the Public IP for your instance.
Open a browser and enter the public IP address. You should see the following message:

Note: Delete the Cluster, Task definition, EFS, terminate the instance if you no longer need them.
Was this document helpful? How can we make this document better. Please provide your insights. You can download PDF version for reference.
For your aws certification needs or for aws learning contact us.


Very easy to understand the concept Amazon EFS along with Amazon ECS
It is easy to understand the concept of Amazon EFS.
Easy to learn the concept of using Amazon EFS along with Amazon ECS
Easy to learn the concept of using Amazon EFS along with Amazon ECS
This tutorial blog helps to understand the concept of using Amazon EFS with Amazon ECS.