
Create an Application Load Balancer in AWS Cloud
- Parag
- Mar 12, 2021
- 4 min read

Updated: Feb 28, 2024
Create an Application Load Balancer in AWS Cloud.
This blog is updated by Rucha Kulkarni
Objectives: 1. Learn to create application load balancer. 2. Learn to configure path-based routing, by adding a rule to forward requests to another target group based on URL.
Step 1: In AWS Console go to EC2 Service. Create 2 Linux Web Servers in 2 different availability zones with the help of our step wise blog here. The modification in script can be done as follows.
First WebServer in Availability Zone 1a: #!/bin/bash
yum -y update
yum -y install httpd
chkconfig httpd on
service httpd start
echo "<html><h1>Hello! This is your First Web Server!</h1></html>" > /var/www/html/index.html
Second WebServer in Availability Zone 1b: #!/bin/bash
yum -y update
yum -y install httpd
chkconfig httpd on
service httpd start
echo "<html><h1>Hello! This is your Second Web Server!</h1></html>" > /var/www/html/index.html

Similarly, create 2 Linux Image Server with the following script. The script can be as follows.
Note: In the below code under the <ahref=’1.jpg’> you have to add path of image from your local file or from google as well.
First ImageServer in Availability Zone 1a:
#!/bin/bash
yum -y update
yum -y install httpd
chkconfig httpd on
service httpd start
mkdir /var/www/html/img/
echo "<html xmlns='http://www.w3.org/1999/xhtml' >
<head><title>My First Website Home Page</title></head> <body>
<h1>Welcome to mywebsite</h1> <p>From First Images Webserver!</p> <a href='1.jpg'>Marigolds</a>
<ahref='2.jpg'>Roses</a> </body>
</html>" > /var/www/html/img/index.html
Second ImageServer in Availability Zone 1b:
#!/bin/bash
yum -y update
yum -y install httpd
chkconfig httpd on
service httpd start
mkdir /var/www/html/img/
echo "<html xmlns='http://www.w3.org/1999/xhtml' >
<head><title>My Second WebsiteHome Page</title></head> <body>
<h1>Welcome to mywebsite</h1> <p>From Second Images Webserver!</p> <a href='1.jpg'>Marigolds</a>
<ahref='2.jpg'>Roses</a> </body>
</html>">/var/www/html/img/index.html

Step 2: In EC2 Service console side panel, go to Target Groups under Load Balancing. Here we have to create one target group for Web Servers. Click on Create Target Group.


Scroll down and provide Target group name as MyWebServerTG. Scroll down further to Health checks, enter Health check path as /index.html.

Under Advanced health check settings drop down, give the values as follows: Healthy threshold: 2 Unhealthy threshold: 2 Timeout: 3 Interval: 10

Scroll down and click on Next. In Register targets, register the two WebServers which we created before in step1 as targets. Click on Include as pending below.

Scroll down and click on Create target group.

Step 3: In EC2 Service console side panel, go to Target Groups under Load Balancing. Now we create a new TG for the Image Servers. Click on Create Target Group. Scroll down and provide Target group name as MyImagebServerTG. Scroll down further to Health checks, enter Health check path as /img/index.html.

Under Advanced health check settings drop down, give the values as follows: Healthy threshold: 2 Unhealthy threshold: 2 Timeout: 3 Interval: 10
Scroll down and click on Next. In Register targets, register the two ImageServers as targets. Click on Include as pending below.

Scroll down and click on Create target group.
Step 4: In EC2 Service console side panel, go to Load Balancers under Load Balancing. Click on Create Load Balancer.

Select Application Load Balancer.

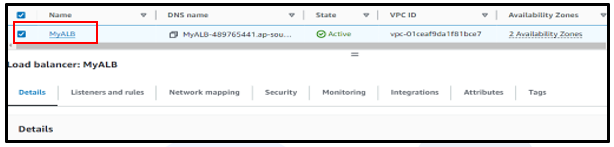
Provide Load Balancer Name as MyALB.

Under network mapping, scroll down to Availability Zones and select availability zones in which web servers and image servers are created. In our case we select 1a and 1b.

Under Security groups, deselect the default Security group and select the WebServerSG used while creation of above 4 EC2 servers.

Under Listeners and routing go to HTTP:80 and from Listener and from Default action open the drop-down and select the WebServerTG as target group.

Click Tags and provide Key: Name and Value: MyAppLB. Keep rest defaults as it is and Click on Create Load Balancer.
Step 5: In EC2 Console go to Load Balancer, select the MyALB Load Balancer from the checkbox.

Click on the Listeners Tab.

Select protocol port HTTP:80 which we selected while creating the above MyALB in step4 and click on Manage rules –> Add rule

Click on Manage rules and select Add rule.

An interface showing information about your ALB will appear.

In Name and tags provide key: name and value: RuleForALB click on Next.

Under define rule conditions click on add conditions.

Now click on choose condition dropdown.

Choose path from the dropdown and provide the path value as /img/* in the text box as shown below. Click on confirm.

You can see the details of your path once you click on confirm. Now click on next.

Under Define rule actions, keep routing actions as Forward to target groups which will be default.
Under target groups, choose MyImageServerTG from the dropdown.
Now click on next.

Under set rule priority, under priority set priority to 1.

Also, your Listener rule details which we have added before will be shown below.
Then click on next.

Under review, check all the information (target group, priority, path), click on create.

Step 6: Now go to load balancer page select MyALB from the check box.
On the same details tab, scroll down and copy the DNS name.

Paste the DNS name on your browser and run the browser.
You can see your First Web Server.

Keep on refreshing the browser you will see the Second Web Server as well.

To run your image servers, add /img/ at the end of your copied DNS and run the browser.
Note: Remember we have created a path as /img/* in the previous steps.
Click on the reference links ‘Marigolds’ and ‘Roses’ you can see your images which you uploaded while creating the image servers.

Keep on refreshing the browser and you can see the second server as well.

Note: If you no longer need the Load Balancer, delete the ALB and Target Groups. Also Terminate the four instances.
Was this document helpful? How can we make this document better. Please provide your insights. You can download PDF version for reference.
For your aws certification needs or for aws learning contact us.

done
very useful steps to understand the Load balancer
Very well explained !
completed
very useful information